Thursday, February 13, 2014

MoneyPolo Card- Prepaid MasterCard® A Multi Currency Money Processor (UWCFS Quick Card)

Money Polo A Good Money Processor

The MoneyPolo Card (UWCFS Quick Card) is a Prepaid MasterCard® that comes in US dollars and has features of an ordinary debit card, but since not linked to a bank account, is granted without any credit checks. The UWCFS QUICK CARD is a prepaid MasterCard®. This means that UWCFS Quick Card can be used in over a hundred countries where there is a MasterCard® sign. The wire transfer, at the same time, can be made through UWCFS to and from anywhere in the world at any of their branches, via their agent network or through the Call Centre.

There are two ways how they work: you can provide your employees with the already existing UWCFS Quick Card or make a step forward and “create” your own card on the UWCFS platform, which you can then design to suit your corporate identity while still enjoying the all the befits the UWCFS Quick Card has to offer. 

If you opt for safe and secure international bank wire transfers, UWCFS competitive rates will come in as a pleasant surprise. The cost of the wire transfer can be paid by sender or recipient, or be shared between the parties.


Once the registration, which is promised to be short and simple, is completed, and your address has been verified via sms or email and your ID proven, you will be able to enjoy a straightforward account managing system and the full IT support that come with every account created with UWCFS.

To register or find our more Click here

How to open a MoneyPolo account?
To open an account, all you need to do is to register on the website. You will receive an email with further instructions.

Who can open a MoneyPoloFS account?
Eligible individuals (aged 18 and older) and legal persons can open a MoneyPolo account.
To enjoy all our services, you need to complete the entire registration and verification processes.
Mayzus Financial Services is unable to open accounts for US citizens or residents.

A Proof of Identity:
-Copy of your ID needs to:
- be valid for another 6 months
- be written with latin letters
-include your photograph, date of birth, a serial number, and issue/expiration dates
It could be:
-Passport 
-Driving License (both sides)
-National ID (both sides)
Government issued documents with the photo
MoneyPolo will accept a good quality, color scanned copy of the document

Proof of Residence
The proof of address should be at the applicant's name ( cannot accept documents with any other name than your own).
*As an exception we can accept documents with the family name on it (subject to the management decision).
The proof of address should bear the same address you provided during the registration. The proof of address should be complete and contain the postal code.

The proof of address should be not older than 90 days if you upload it via Account Management System and not older than 60 days if sent through regular mail. This could be a utility bill or bank statement on your name; cannot accept bills from mobile operators due to current legal requirements. The original bank statement has to be also certified: to be stamped as a true copy by the issuing bank.

*MoneyPolo cannot accept electronic/online downloaded documents, i.e. online banking statement e.t.c.

*PO BOX address in a proof of address is not an acceptable form of a delivery address for the MayzusFS and MoneyPolo cards.

Please provide a certified translation of the documents if originally they are not in Russian, English, French, German or Czech.
 
The UWCFS Quick Card is not available for citizens of the following countries:
Bosnia and Herzegovina
Serbia and Montenegro
Iran (the Islamic Republic of)
Israel
India
Macedonia (former republic of Yugoslavia)
Burma (now Myanmar)
Myanmar (formerly Burma)
Somalia
Cuba
Sudan
Palestine

NB: Our company name 'UWC Financial Services Ltd' has been changed to 'Mayzus Financial Services Ltd'. The Account Management System has been renamed 'MoneyPolo Account'.

Tuesday, January 21, 2014

Add Custom Robots.txt For Blogger

It is very essential for you to submit an xml sitemap to Google so as to get your site content indexed by the search engine crawlers. It’s easy to submit your blogs xml sitemap to either Blogger or Google Webmasters Tools. Preferably xml sitemap should be submitted to Blogger, though manual configuration is needed to make it start working. Now follow the bellow steps to manually configure your xml Blogger blogs sitemap.

Step 1. Go to: http://ctrlq.org/blogger/ and generate your xml Blogger blogs sitemap as shown bellow.

XML site for robots.txt
XML SITEMAP

Step 2. Once you’ve entered your blog url/address in (Step 1.) Hit the “Generate Sitemap” button to generate your unique xml Blogger sitemap. Now copy the generated sitemap text from the text field-box.

robots txt
Blogger Sitemap

Step 3. After might have completed the steps (Step 1 And 2). Login to your Blogger blog, navigate to Blogger Dashboard and click on “Settings”, now look for “Search Preferences” and click on it, a warning text will open, just click on edit as shown bellow.

add robots.txt

Step 4. Now in search preferences you’ll see, Enable Custom Robots.txt content? Select Yes and a text field-box will appear just bellow the command (Enable Custom Robots.txt content?). Now paste the Blogger xml sitemap contents you generated in (Step 1.). After pasting the Blogger xml sitemap contents click on the “Save Changes” button as pictured bellow.

robots.txt setup

Step 5. You’re done! It’s as easy as that.

Compress Large File To Unbelievable Small Size By KGB Archiver

Compress 1GB file to 1MB

KGB Archiver is the compression tool with unbelievable high compression rate. KGB Archiver is Free and Open Source software released under the terms of the GNU General Public License.You can compress 1GB file into 10MB by using KGB Archiver. So that you can easily upload and download file.
Features
  • Supports native .kgb files and .zip files
  • AES-256 encryption
  • It is able to create self-extracting archives
  • Unicode is supported in both the user interface and filesystems
  • Multilanguage support (including Arabic, German, Greek, Japanese, Polish, Portuguese, Serbian, Spanish, and Ukrainian)
  • An Explorer shell extension is available for the Windows versions.
Instructions
 This software is  FREE and easy to use.
 No serial key or activation required.

Download Links
Download KGB Archiver using Cnet
Download KGB Archiver using Softpedia

How to Use?
Step 1: Download the software from link given above and install it on your Computer.
Step 2: Open the KGB Archiver, select “Compress Files” and click on Next.

KGB Archiver window

Step 3: On the next Menu, select the file or folder that you want to compress and select the Compression level to Maximum.
Step 4: Select the file to Compress by Click on “Add File” button.

KGB Archiver Menu

After Selecting, Click on next, file compression process will start. This will take some time, depend on your file size.


Finishing Compress KGB archiver

Saturday, January 11, 2014

How to Load Money to Payoneer Card?

How to Add Funds to Payoneer Account? With empty Payoneer Card one can not link PayPal with it. So, this guide will help you out to load money in Payoneer Account.

Methods to Add Money Funds to Payoneer Account
Before proceeding further first of all you should confirm that:
US Payment Service is active on your Account.
Name on your Payoneer & PayPal account is same.
If your US Payment Service is not active then you will not be able to charge your Payoneer Account.

Via PayPal
If you have funds available in your PayPal account then you can easily transfer those to Payoneer even if your PayPal account is not verified. PayPal will still allow you to withdraw funds to Payoneer bank account. First login to your PayPal account and from the profile menu, click on Add/Edit bank account. A new page will be opened in front of you and you will have to click on add button from there. Now you will have to enter your Payoneer bank account details on the newly opened page. Login to your Payoneer account and from the receive money tab, click on US Payment Profile in order to see your US Payment Service Information.
After successfully adding bank account, now you will be able to withdraw funds to Payoneer bank account and the funds will appear within 3-4 days. After that you can proceed further and link Payoneer MasterCard with PayPal.

Via Card to Card Transfer
If any of your friend or family member has funds available in his Payoneer account then he can easily transfer to your account. But there are certain requirements for successful card to card funds transfer and one of those major requirements is that US Payment service must be active on both accounts.

In order to send money from one Payoneer card to another, first login to your account and from the Send Money tab, click on send to another card. Enter the receiver’s email address, amount to transfer, notes etc. on the next page and proceed further accordingly. The funds will appear in the receiver’s account with in 2 hours. Please note that the minimum amount you can transfer from one card to another is 20$ and maximum is 1000$. There are no extra fees/charges associated with this process.


Via Payoneer Private Loads
Payoneer allows you to load money into your account via Visa, MasterCard, JCB or Discover. First of all click here and enter the email address or Card number of the receiver. Enter the amount you want to load and mention the reason for which you are going to load the account. Finally select your Payment method and continue further to complete the process. US citizens may also fund their account using their US Bank Account.

Any questions? Ask below in comments.

Sunday, January 5, 2014

Get A Verified Paypal (US) Account in Unsupported Countries

Get a Verified Paypal (US) Account  in unsupported countries. Are you from PayPal unsupported country and want to get a verified PayPal account? You can get it by using Payoneer’s US Payment Service to Verify your PayPal account. Get a Payoneer account now. If you have already Payoneer account, follow below steps to get your PayPal Verified using Payoneer’s US Payment Service (USPS).

Verify PayPal Using Payoneer US Payment Service

* Sign-in to your Payoneer account and navigate to US Payment Service under Receive Money tab

get USPS information

* On US Payment Service page, scroll down to bottom where you will see the routing number and account number which US Payment Service has provided you

USPS information

* Note down these two numbers or let this page open and open your unverified PayPal account in another tab or window

* In your PayPal dashboard, you will see the status of your account as "Unverified". Click "Get Verified" link

verified paypal

In next page, select “Add Bank Account” option and then provide the routing number and account number which you have noted from US Payment Service’s page in your Payoneer account and click "Continue"


bank name account and routing number

* After linking your account number with PayPal, wait for 2 or 3 days
* PayPal will make two test transactions to your Payoneer account within two or three days. You will              receive an email notification from Payoneer when the test money is received in your account
* Go to your Payoneer account and note down the two amounts which PayPal has sent you

payoneer account statement

* Now go back to your PayPal account and again follow "Get Verified" link
* In appeared screen, select "Confirm Bank Account" option

confirm bank account
* Enter the test amounts which PayPal has sent on your Payoneer account and click "Submit"

paypal bank deposits
Now your PayPal account is Verified.

Any questions? Ask below in comments.

Link Your Payoneer Prepaid MasterCard® With PayPal Account And All Limitations are Lifted

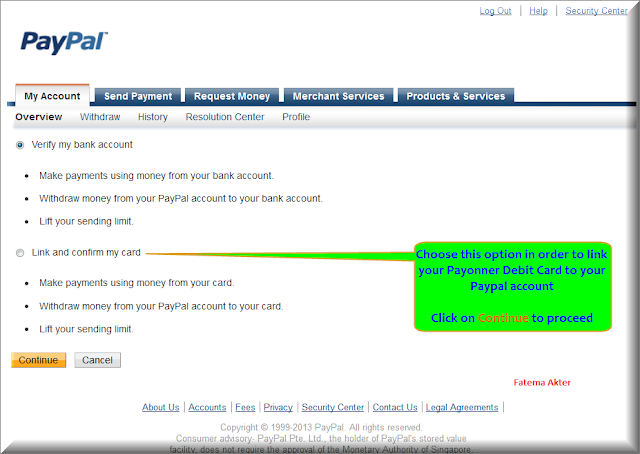
If you have Payoneer Prepaid MasterCard®, then you can link it with your PayPal account for online shopping or to verify PayPal account. To link the Payoneer Prepaid debit  MasterCard® with PayPal, first activate it from your Payoneer account and then load a few dollars $4-$5 to your card.

You can load the money via bank wire transfer or can transfer the money from PayPal by linking your Payoneer account with it. Once your card has $4 or $5 loaded to it, initiate the linking, as PayPal deducts a small amount for verification. Although ensure that your name on PayPal account and on your card is similar.
Also Add fund to your  Payoneer Prepaid MasterCard® card by click here

Before linking the card, check once again and confirm that:
Activated Your  Payoneer Prepaid MasterCard®
Loaded Few Dollars To Your Card ($4-$5)
Your Name On PayPal Account And On The Card Is Same


If your card meets above requirements, link it to your PayPal account by completing below steps:

NB: PayPal doesn’t charge any money. And when you link your debit card, all limitations are lifted. You can send withdraw money without any limit.

Follow the instructions below to link your Payoneer debit card to Paypal:
Log in your Paypal account:

Under the Account profiles option. A drop-down menu will appear, then click on Add debit/credit card.
Payoneer link card
Now put your 16 digit Payoneer card number.
** You will be asked to insert your CVV number on the next text box (The CVV number of your Payoneer card is composed by 3 digits given on the back just after the card number) input the 3-digit code correctly.
** Select the expiry date of your card.
** Write the name as mentioned on the card.

payoneer card link
** Now click on “Confirm”.
Now, check your Payoneer account to see if PayPal has charged any money or not. You will now need the 4-digit code sent by Paypal to verify your debit card. Find the code and put that code in your PayPal verification page.
Upon completion, the authorized transaction amount will be refunded to your card, and your card will be verified and registered.

Instructions to link your Payoneer US Payment Service to Paypal:
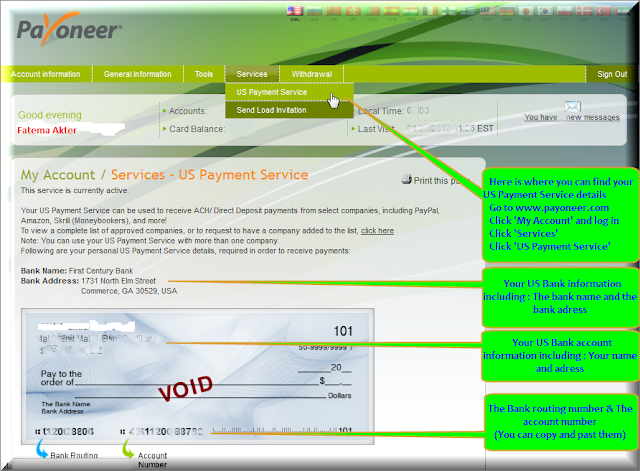
Where can I find my US Payment Service details?
Please go to www.payoneer.com
Click 'My Account' and log in
Click 'Services'
Click 'US Payment Service'


payoneer USPS information
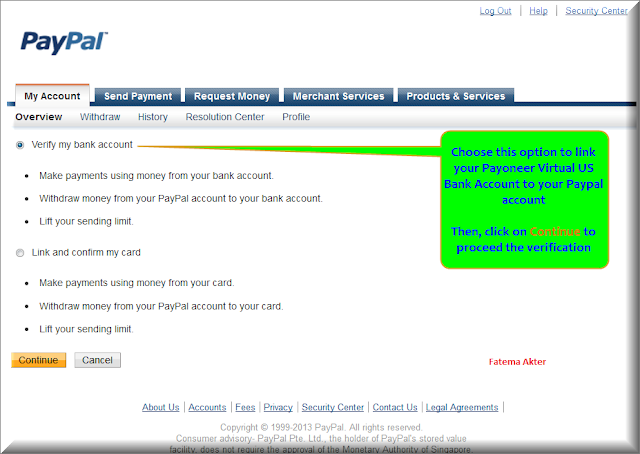
Once signed in to your PayPal account, go to the “Profile” menu and select “Add or Edit US Bank Account.” You will then need to enter your US Payment Service details, which can be found on your My Account page.

verify bank account
Link your U.S. bank account to withdraw payments from your available balance at any time. Also, your available balance is automatically transferred to this account on the first day of every month.
If your PayPal account is not verified yet, we'll ask you to confirm that you control this bank account. After you link your U.S. bank account, we'll deposit 2 small amounts (less than $1.00 USD each) - they will show up on your bank statement 2-3 business days later.

link your bank account to paypal

Fees :
There is a fee of 1% of each payment received using the service.
The account owner name for the US Payment Service is the same name listed on your Payoneer card.
The US Payment Service will only enable you to receive incoming payments. Attempts to transfer funds using the US Payment Service to other accounts will be rejected. More specifically, attempts to transfer funds from the US Payment Service to PayPal accounts will be automatically rejected and may cause your US Payment Service to be blocked by PayPal.

If you have any questions regarding Linking/Verify your  Payoneer Prepaid MasterCard® with PayPal account, ask below in comments. 

Wednesday, January 1, 2014

Get Chikita Account In Order to Make Money

Get Chitika Account In Order to Make Money

get chitika account

In order to make money from Chitika, there is a two-step process:

1. The first step is to create a publisher’s account with Chitika. This account is free and you will be able to get access to html codes in which you place on the side of your website. Place the code onto your website and when it’s published you will see an ad related to the content you have on your website.
2. The second step is to get traffic to your website in order to increase your income with Chitika. Some people already have massive amounts of traffic that allow them to profit from Chitika right away.

TIPS: To get more traffic to your website:
* Write high quality articles and post them on your website.
* The more content, the better, just make sure you don’t copy someone else’s articles.
* Target one keyword and underline the keyword, bold it, and italicize it.

Caution: Never click on your own ads to try and make a few bux. Chitika keeps track of all the clicks and it’s against the terms for anyone to click on their own ads. You will be caught and your Chitika account will be banned.